> For the complete documentation index, see [llms.txt](https://doc.wearepatchworks.com/product-documentation/llms.txt). Markdown versions of documentation pages are available by appending `.md` to page URLs; this page is available as [Markdown](https://doc.wearepatchworks.com/product-documentation/connectors-and-instances/event-connectors/adding-a-new-event-connector.md).
# Adding a new event connector
## Introduction
When adding a new event connector, you step through a guided three-stage setup:
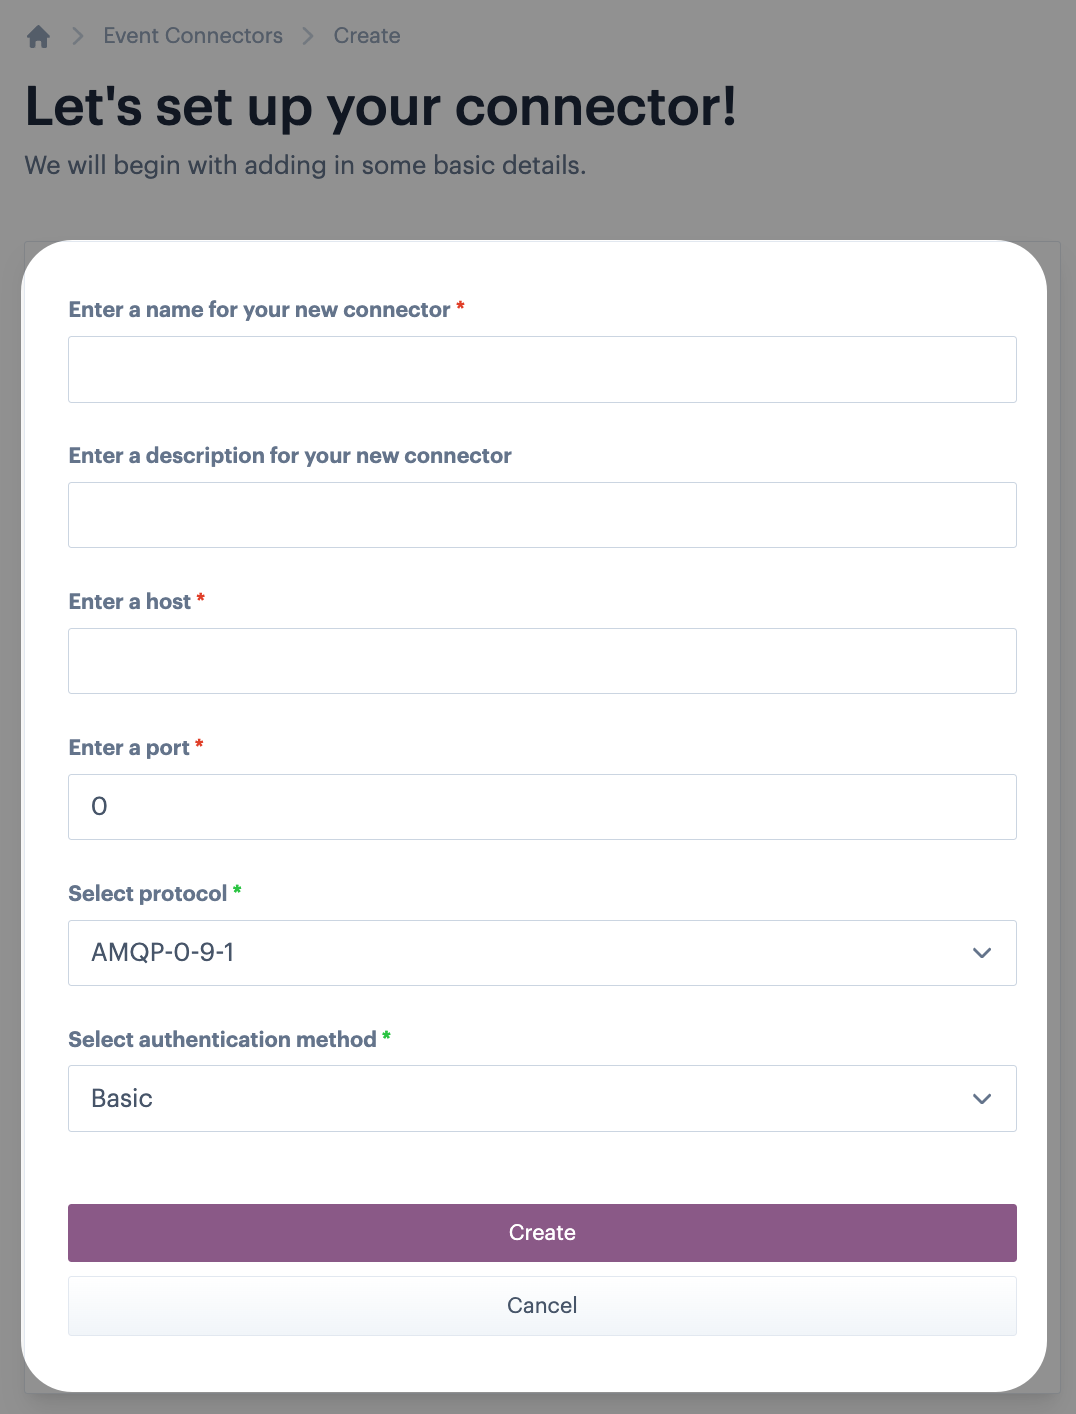
1. **Settings** - name, description, host, port, protocol and authentication method
2. **Authentication** - credentials for your broker, with a **test connection** check before you continue
3. **Queues/Topics** - the queues/topics this connector should listen on
The settings and queues stages are the same for every protocol. The authentication stage differs depending on whether you selected **AMQP 0-9-1** or **IBM MQ**, so both are covered below.
## Need to know
* New event connectors are available for selection as **brokers** in process flow [trigger shapes](/product-documentation/process-flows/building-process-flows/process-flow-shapes/standard-shapes/trigger-shape/trigger-shape-event-listener.md) as soon as they are saved successfully.
* Event connector triggers only become active when the process flow is [deployed](/product-documentation/process-flows/building-process-flows/process-flow-versioning.md#deploying-a-draft-or-inactive-version) and [enabled](/product-documentation/process-flows/managing-process-flows/enabling-and-disabling-a-process-flow/enabling-and-disabling-a-process-flow-without-virtual-enviroments.md).
* ALL messages published to selected queues/topics are passed through to the process flow.
## The steps
**Step 1**\
Log into the Patchworks dashboard, then select **process flows** > **event connectors** from the left-hand navigation menu.
**Step 2**\
Click the **add new event connector** button:
**Step 3**\
You're prompted to enter general settings for this connector:
Use the table below as a guide:
| Setting | Summary |
| --------------------- | ---------------------------------------------------------------------------------------------------------------------------------------------------------------------------------------------------------------------------------------------------------- |
| Name | Enter a name for the event connector, as it will identified throughout Patchworks. |
| Description | Enter a description for the event connector to provide a little more detail about its purpose. |
| Host | Enter the the address of the machine where your messaging broker (e.g. RabbitMQ) is running - typically this is an IP address or a domain name. |
| Port | Enter the network port where RabbitMQ is listening for connections. RabbitMQ uses the AMQP (Advanced Message Queuing Protocol) for communication which, by default, listens on port `5672` for non-TLS connections and on port `5671` for TLS connections. |
| Protocol | Select the appropriate protocol for your messaging broker. |
| Authentication method | Currently, `basic auth` is supported. |
**Step 4**\
Click the **create** button.
**Step 5**\
Enter your authentication credentials for the message broker - in this case, username and password:
**Step 6**\
Click the **Test Connection** button.
**Step 7**\
Now you can select or add which message queue/topic to associate with this event connector:
Any existing queues are listed for selection, or you can add new queues/topics.
{% hint style="info" %}
When you add a new queue/topic here, it is added to your message broker. You can add as many as you need - any queues/topics that you add will be available for selection when this event connector is selected as the **broker** in a process flow [trigger shape](/product-documentation/process-flows/building-process-flows/process-flow-shapes/standard-shapes/trigger-shape/trigger-shape-event-listener.md).
{% endhint %}
**Step 8**\
Having added all required queues/topics, the event connector is ready to [use in process flows](/product-documentation/process-flows/building-process-flows/process-flow-shapes/standard-shapes/trigger-shape/trigger-shape-event-listener.md).
## Related information
* [Trigger shape (event connector)](/product-documentation/process-flows/building-process-flows/process-flow-shapes/standard-shapes/trigger-shape/trigger-shape-event-listener.md)
.png?alt=media&token=a516a9ef-9533-423e-b18f-dedb79b97b81)