> For the complete documentation index, see [llms.txt](https://doc.wearepatchworks.com/product-documentation/llms.txt). Markdown versions of documentation pages are available by appending `.md` to page URLs; this page is available as [Markdown](https://doc.wearepatchworks.com/product-documentation/process-flows/managing-process-flows/flow-deployment/deploying-a-process-flow-without-virtual-environments.md).
# Deploying a process flow (without virtual environments)
## Introduction
When a process flow is deployed and [enabled](/product-documentation/process-flows/managing-process-flows/enabling-and-disabling-a-process-flow/enabling-and-disabling-a-process-flow-without-virtual-enviroments.md), it runs automatically, according to defined [trigger shape](/product-documentation/process-flows/building-process-flows/process-flow-shapes/standard-shapes/trigger-shape.md) settings (or [API requests](/product-documentation/developer-hub/patchworks-core-api.md)).
Typically, you would build your required flow and then deploy the `draft` version however, it is possible to deploy an older, `inactive` version if needed.
{% hint style="info" %}
For detailed information about the different process flow versions that you may encounter, please see [Process flow versioning](/product-documentation/process-flows/building-process-flows/process-flow-versioning.md).
{% endhint %}
{% hint style="warning" %}
If the [virtual environments](/product-documentation/virtual-environments/about-virtual-environments.md) feature is enabled for your company profile, the steps detailed on this page are different - please refer to [Deploying a single process flow to a virtual environment](/product-documentation/virtual-environments/implementing-virtual-environments/deploying-a-single-process-flow-to-a-virtual-environment.md).
{% endhint %}
## Need to know
* A process flow can be deployed once. Each time you deploy a `draft` version, the current `deployed` version becomes `inactive`, making way for the new deployment.
* For a process flow to run automatically (based on any defined [trigger settings](/product-documentation/process-flows/building-process-flows/process-flow-shapes/standard-shapes/trigger-shape.md)), it must be both deployed and [enabled](/product-documentation/process-flows/managing-process-flows/enabling-and-disabling-a-process-flow/enabling-and-disabling-a-process-flow-without-virtual-enviroments.md). If the [virtual environments feature is not enabled for your company profile](/product-documentation/process-flows/managing-process-flows/flow-deployment.md#how-do-i-know-if-virtual-environments-are-enabled), you must decide whether a deployed flow is enabled - this doesn't happen as part of the deployment process.
## The steps
{% stepper %}
{% step %}
**Access version details for the required process flow**
Open [settings](/product-documentation/process-flows/building-process-flows/process-flow-settings.md) for your process flow and scroll down to the `versions` panel.
{% hint style="info" %}
For detailed instructions, please refer to [Accessing process flow versions](/product-documentation/process-flows/building-process-flows/process-flow-versioning/accessing-process-flow-versions.md).
{% endhint %}
{% endstep %}
{% step %}
**Select the required version**
The currently selected version (i.e. the version displayed on the canvas) is shown with an 'eye' icon in the `selected` column. For example:
Click anywhere on the `draft` or `inactive` version you want to deploy and check that the canvas updates with the expected content. For example:
{% endstep %}
{% step %}
**Deploy this version**
Click the `deploy` button (just above the `variables` section). For example:
{% hint style="info" %}
Alternatively, you can click the ellipses associated with your selected version. For example:
Then select the `deploy` option. For example:
{% endhint %}
The `draft` version transitions to `deployed` and the previously `deployed` version transitions to a new `inactive` version.
{% endstep %}
{% step %}
**Check the enabled/disabled status**
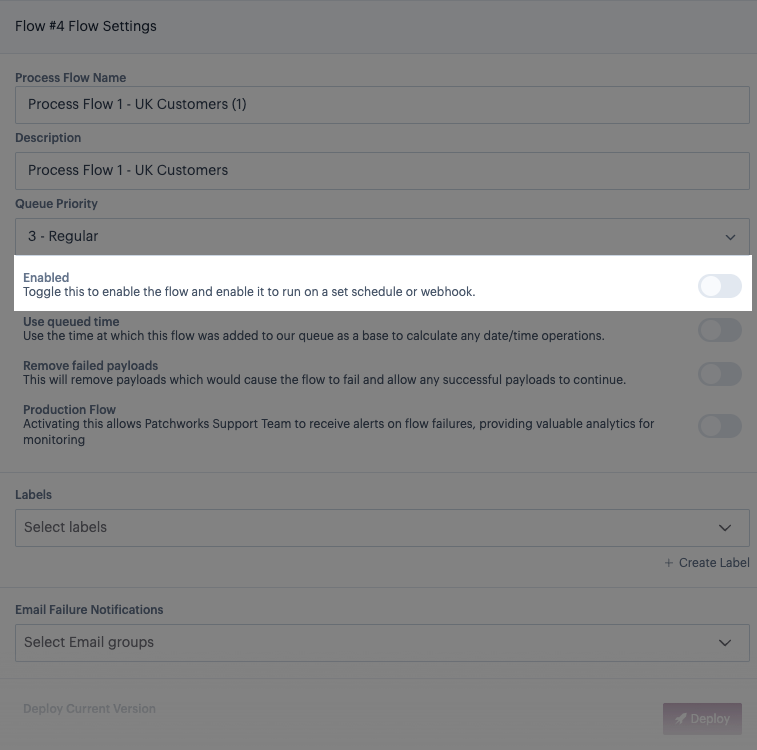
Scroll up to the top of the settings panel and check how the `enabled` toggle option is set. For example:
Set this option as required, bearing in mind:
* If this option is toggled `off`, the flow will NOT run according to any defined [trigger settings](/product-documentation/process-flows/building-process-flows/process-flow-shapes/standard-shapes/trigger-shape.md) - it only runs if you choose to do so [manually](/product-documentation/process-flows/managing-process-flows/initialising-a-process-flow-manually.md) (useful if you are testing a flow).
* If this option is toggled `on`, the flow will run according to any defined [trigger settings](/product-documentation/process-flows/building-process-flows/process-flow-shapes/standard-shapes/trigger-shape.md) immediately.
{% endstep %}
{% endstepper %}


 Then select the `deploy` option. For example:
 {% endhint %}
The `draft` version transitions to `deployed` and the previously `deployed` version transitions to a new `inactive` version.
{% endstep %}
{% step %}
**Check the enabled/disabled status**
Scroll up to the top of the settings panel and check how the `enabled` toggle option is set. For example:
{% endhint %}
The `draft` version transitions to `deployed` and the previously `deployed` version transitions to a new `inactive` version.
{% endstep %}
{% step %}
**Check the enabled/disabled status**
Scroll up to the top of the settings panel and check how the `enabled` toggle option is set. For example: